搜索到
105
篇与
的结果
-
 DBeaver 官网地址英文网页: https://dbeaver.io/英文网页: https://dbeaver.com/旗舰版下载地址版本平台架构链接备注旗舰版最新版windowsx64dbeaver-ue-latest-x86_64-setup.exe 旗舰版最新版windowsx64dbeaver-ue-latest-win32.win32.x86_64.zip 旗舰版最新版macOSx64dbeaver-ue-latest-macos-x86_64.dmg 旗舰版最新版macOSarm64dbeaver-ue-latest-macos-aarch64.dmg 旗舰版最新版debian系x64dbeaver-ue_latest_amd64.deb 旗舰版最新版redhat系x64dbeaver-ue-latest-stable.x86_64.rpm 旗舰版最新版linuxx64dbeaver-ue-latest-linux.gtk.x86_64.tar.gz 旗舰版24.1.0windowsx64dbeaver-ue-24.1.0-x86_64-setup.exe 旗舰版24.1.0windowsx64dbeaver-ue-24.1.0-win32.win32.x86_64.zip 旗舰版24.1.0macOSx64dbeaver-ue-24.1.0-macos-x86_64.dmg 旗舰版24.1.0macOSarm64dbeaver-ue-24.1.0-macos-aarch64.dmg 旗舰版24.1.0debian系x64dbeaver-ue_24.1.0_amd64.deb 旗舰版24.1.0redhat系x64dbeaver-ue-24.1.0-stable.x86_64.rpm 旗舰版24.1.0linuxx64dbeaver-ue-24.1.0-linux.gtk.x86_64.tar.gz 旗舰版24.1.0linuxx64dbeaver-ue-24.1.0-linux.gtk.x86_64-nojdk.tar.gz不包含jdk旗舰版24.1.0linuxarm64dbeaver-ue-24.1.0-linux.gtk.aarch64-nojdk.tar.gz不包含jdk旗舰版23.3.0windowsx64dbeaver-ue-23.3.0-x86_64-setup.exe 旗舰版23.3.0windowsx64dbeaver-ue-23.3.0-win32.win32.x86_64.zip 旗舰版23.3.0macOSx64dbeaver-ue-23.3.0-macos-x86_64.dmg 旗舰版23.3.0macOSarm64dbeaver-ue-23.3.0-macos-aarch64.dmg 旗舰版23.3.0debian系x64dbeaver-ue_23.3.0_amd64.deb 旗舰版23.3.0redhat系x64dbeaver-ue-23.3.0-stable.x86_64.rpm 旗舰版23.3.0linuxx64dbeaver-ue-23.3.0-linux.gtk.x86_64.tar.gz 旗舰版23.3.0linuxx64dbeaver-ue-23.3.0-linux.gtk.x86_64-nojdk.tar.gz不包含jdk旗舰版23.3.0linuxarm64dbeaver-ue-23.3.0-linux.gtk.aarch64-nojdk.tar.gz不包含jdk企业版下载地址版本平台架构链接备注企业版最新版windowsx64dbeaver-ee-latest-x86_64-setup.exe 企业版最新版windowsx64dbeaver-ee-latest-win32.win32.x86_64.zip 企业版最新版macOSx64dbeaver-ee-latest-macos-x86_64.dmg 企业版最新版macOSarm64dbeaver-ee-latest-macos-aarch64.dmg 企业版最新版debian系x64dbeaver-ee_latest_amd64.deb 企业版最新版redhat系x64dbeaver-ee-latest-stable.x86_64.rpm 企业版最新版linuxx64dbeaver-ee-latest-linux.gtk.x86_64.tar.gz 企业版24.1.0windowsx64dbeaver-ee-24.1.0-x86_64-setup.exe 企业版24.1.0windowsx64dbeaver-ee-24.1.0-win32.win32.x86_64.zip 企业版24.1.0macOSx64dbeaver-ee-24.1.0-macos-x86_64.dmg 企业版24.1.0macOSarm64dbeaver-ee-24.1.0-macos-aarch64.dmg 企业版24.1.0debian系x64dbeaver-ee_24.1.0_amd64.deb 企业版24.1.0redhat系x64dbeaver-ee-24.1.0-stable.x86_64.rpm 企业版24.1.0linuxx64dbeaver-ee-24.1.0-linux.gtk.x86_64.tar.gz 企业版24.1.0linuxx64dbeaver-ee-24.1.0-linux.gtk.x86_64-nojdk.tar.gz不包含jdk企业版24.1.0linuxarm64dbeaver-ee-24.1.0-linux.gtk.aarch64-nojdk.tar.gz不包含jdk企业版23.3.0windowsx64dbeaver-ee-23.3.0-x86_64-setup.exe 企业版23.3.0windowsx64dbeaver-ee-23.3.0-win32.win32.x86_64.zip 企业版23.3.0macOSx64dbeaver-ee-23.3.0-macos-x86_64.dmg 企业版23.3.0macOSarm64dbeaver-ee-23.3.0-macos-aarch64.dmg 企业版23.3.0debian系x64dbeaver-ee_23.3.0_amd64.deb 企业版23.3.0redhat系x64dbeaver-ee-23.3.0-stable.x86_64.rpm 企业版23.3.0linuxx64dbeaver-ee-23.3.0-linux.gtk.x86_64.tar.gz 企业版23.3.0linuxx64dbeaver-ee-23.3.0-linux.gtk.x86_64-nojdk.tar.gz不包含jdk企业版23.3.0linuxarm64dbeaver-ee-23.3.0-linux.gtk.aarch64-nojdk.tar.gz不包含jdk精简版下载地址版本平台架构链接备注精简版最新版windowsx64dbeaver-le-latest-x86_64-setup.exe 精简版最新版windowsx64dbeaver-le-latest-win32.win32.x86_64.zip 精简版最新版macOSx64dbeaver-le-latest-macos-x86_64.dmg 精简版最新版macOSarm64dbeaver-le-latest-macos-aarch64.dmg 精简版最新版debian系x64dbeaver-le_latest_amd64.deb 精简版最新版redhat系x64dbeaver-le-latest-stable.x86_64.rpm 精简版最新版linuxx64dbeaver-le-latest-linux.gtk.x86_64.tar.gz 精简版24.1.0windowsx64dbeaver-le-24.1.0-x86_64-setup.exe 精简版24.1.0windowsx64dbeaver-le-24.1.0-win32.win32.x86_64.zip 精简版24.1.0macOSx64dbeaver-le-24.1.0-macos-x86_64.dmg 精简版24.1.0macOSarm64dbeaver-le-24.1.0-macos-aarch64.dmg 精简版24.1.0debian系x64dbeaver-le_24.1.0_amd64.deb 精简版24.1.0redhat系x64dbeaver-le-24.1.0-stable.x86_64.rpm 精简版24.1.0linuxx64dbeaver-le-24.1.0-linux.gtk.x86_64.tar.gz 精简版24.1.0linuxx64dbeaver-le-24.1.0-linux.gtk.x86_64-nojdk.tar.gz不包含jdk精简版24.1.0linuxarm64dbeaver-le-24.1.0-linux.gtk.aarch64-nojdk.tar.gz不包含jdk精简版23.3.0windowsx64dbeaver-le-23.3.0-x86_64-setup.exe 精简版23.3.0windowsx64dbeaver-le-23.3.0-win32.win32.x86_64.zip 精简版23.3.0macOSx64dbeaver-le-23.3.0-macos-x86_64.dmg 精简版23.3.0macOSarm64dbeaver-le-23.3.0-macos-aarch64.dmg 精简版23.3.0debian系x64dbeaver-le_23.3.0_amd64.deb 精简版23.3.0redhat系x64dbeaver-le-23.3.0-stable.x86_64.rpm 精简版23.3.0linuxx64dbeaver-le-23.3.0-linux.gtk.x86_64.tar.gz 精简版23.3.0linuxx64dbeaver-le-23.3.0-linux.gtk.x86_64-nojdk.tar.gz不包含jdk精简版23.3.0linuxarm64dbeaver-le-23.3.0-linux.gtk.aarch64-nojdk.tar.gz不包含jdk社区版下载地址版本平台架构链接备注社区版最新版windowsx64dbeaver-ce-latest-x86_64-setup.exe 社区版最新版windowsx64dbeaver-ce-latest-win32.win32.x86_64.zip 社区版最新版macOSx64dbeaver-ce-latest-macos-x86_64.dmg 社区版最新版macOSarm64dbeaver-ce-latest-macos-aarch64.dmg 社区版最新版debian系x64dbeaver-ce_latest_amd64.deb 社区版最新版redhat系x64dbeaver-ce-latest-stable.x86_64.rpm 社区版最新版linuxx64dbeaver-ce-latest-linux.gtk.x86_64.tar.gz 社区版最新版linuxx64dbeaver-ce-latest-linux.gtk.x86_64-nojdk.tar.gz不包含jdk社区版最新版linuxarm64dbeaver-ce-latest-linux.gtk.aarch64-nojdk.tar.gz不包含jdk社区版24.1.4windowsx64dbeaver-ce-24.1.4-x86_64-setup.exe 社区版24.1.4windowsx64dbeaver-ce-24.1.4-win32.win32.x86_64.zip 社区版24.1.4macOSx64dbeaver-ce-24.1.4-macos-x86_64.dmg 社区版24.1.4macOSarm64dbeaver-ce-24.1.4-macos-aarch64.dmg 社区版24.1.4debian系x64dbeaver-ce_24.1.4_amd64.deb 社区版24.1.4redhat系x64dbeaver-ce-24.1.4-stable.x86_64.rpm 社区版24.1.4linuxx64dbeaver-ce-24.1.4-linux.gtk.x86_64.tar.gz 社区版24.1.4linuxx64dbeaver-ce-24.1.4-linux.gtk.x86_64-nojdk.tar.gz不包含jdk社区版24.1.4linuxarm64dbeaver-ce-24.1.4-linux.gtk.aarch64-nojdk.tar.gz不包含jdk社区版23.3.5windowsx64dbeaver-ce-23.3.5-x86_64-setup.exe 社区版23.3.5windowsx64dbeaver-ce-23.3.5-win32.win32.x86_64.zip 社区版23.3.5macOSx64dbeaver-ce-23.3.5-macos-x86_64.dmg 社区版23.3.5macOSarm64dbeaver-ce-23.3.5-macos-aarch64.dmg 社区版23.3.5debian系x64dbeaver-ce_23.3.5_amd64.deb 社区版23.3.5redhat系x64dbeaver-ce-23.3.5-stable.x86_64.rpm 社区版23.3.5linuxx64dbeaver-ce-23.3.5-linux.gtk.x86_64.tar.gz 社区版23.3.5linuxx64dbeaver-ce-23.3.5-linux.gtk.x86_64-nojdk.tar.gz不包含jdk社区版23.3.5linuxarm64dbeaver-ce-23.3.5-linux.gtk.aarch64-nojdk.tar.gz不包含jdk2024-09-23 21:13:55 星期一
 -
WindTerm 官网地址英文网页: https://kingtoolbox.github.io/项目地址: https://github.com/kingToolbox/WindTerm下载地址版本平台架构链接备注2.6.1linuxx86_64WindTerm_2.6.1_Linux_Portable_x86_64.tar.gz 2.6.1macOSx64WindTerm_2.6.1_Mac_Portable_x86_64.dmg 2.6.1windowsx86WindTerm_2.6.1_Windows_Portable_x86_32.zip 2.6.1windowsx64WindTerm_2.6.1_Windows_Portable_x86_64.zip 更新于2024-08-22 00:25:53 星期四
-
基于Nginx的网站配置https强制访问 1. 前言之前的两篇文章简单记录了 Typecho 博客的搭建过程:1.基于Rocky Linux 8.10系统使用源码搭建LNMP环境,附加安装SQLite2.基于LNMP环境搭建Typecho博客但这里面因为是内网演示使用的是 http访问,不涉及任何 https 的设置。现在到处都能看到网站服务器使用 https ,说是安全性好,咱不懂,也没精力和技术去研究,也不知道咱这没流量的小破站需不需要那么高的安全性,服务器上也没啥重要数据,对安全性我到没那么高要求,毕竟不知道哪天就到期关闭了。。哈哈哈!但是话说回来,对不支持 https 的网站浏览器左上角会出现红色叉叉的 http 标识,实在是太扎眼了,既然都说 https 好,那咱也来折腾一下吧,努力把这个博客搞得好看一点,正规一点,虽说没啥内容,但看着高大上也是不错的。注:以下实验在阿里云轻量应用服务器完成,并非前两篇文章的内网实验,所以之前文中出现的内网IP 192.168.31.84 在本文中由域名 all.17zturn.com 代替,仅IP变化,其他参数配置一致。2. 申请免费的SSL证书要使网站支持 https 访问,首先得准备好 SSL 证书。别问我这是啥,我也不知道,专业的解释需要去专业的地方搜索,作为普通玩家,只要知道需要这么个东西就行了。首先这个证书的获取并不容易,专业的是需要收费的,且费用不低,好在现在为了推广使用 https,有许多机构推出了免费的证书申请,这里我使用的是大名鼎鼎的 Let's Encrypt。从这里申请的证书对专业用途有缺陷,有效期只有90天,但对普通玩家来说已经足够,反正到期可以再次申请新的证书,配置好脚本还可以自动进行申请。2.1. 安装ACME客户端引用官方的一段说明 Let's Encrypt 入门指南为了在您的网站上启用 HTTPS,您需要从证书颁发机构(CA)获取证书(一种文件)。 Let’s Encrypt 正是其中一家证书颁发机构。 要从 Let’s Encrypt 获取您网站域名的证书,您必须证明您对域名的实际控制权。 这一过程通常由 Web 主机上运行的 ACME 协议客户端完成。官网推荐的 AME 协议客户端是 Certbot。但是我这里选用的是acme.sh,其他更多客户端可参考官网提供的客户端列表ACME 客户端。acme.sh 的安装特别简单,以下操作都以 root 用户执行# email字段需要替换为自己的邮箱地址 curl https://get.acme.sh | sh -s email=nopoetry@outlook.com安装后的文件存放在 ~/.acme.sh 目录下,根据项目介绍,后续所有操作的修改都在这个文件内完成,不会污染其他系统文件。安装完成后,推荐关闭终端并重新启动新终端,这样可以直接使用 acme.sh 命令而不用加上繁琐的路径。2.2. 申请证书设置默认ca服务器( acme.sh 脚本默认ca服务器是 zerossl ,经常出错,会导致获取证书的时候一直出现:Pending, The CA is processing your order, please just wait.)acme.sh --set-default-ca --server letsencrypthttp方式验证域名(需保证 acme.sh 客户端与网站内容在同一服务器上)# -d参数指定域名(若要申请泛域名证书,必须明确指定一条二级域名,这里是17zturn.com) # --webroot参数需要替换为自己的网站根目录 acme.sh --issue -d 17zturn.com \ -d www.17zturn.com \ -d all.17zturn.com \ --webroot /var/www/html/typecho这里 acme.sh 客户端会在网站根目录下创建一个验证文件并完成自动验证,验证通过即会自动生成证书。2.3. 安装证书需要使用 acme.sh 客户端自带的命令来安装证书,不可直接使用 ~/.acme.sh 目录下的证书文件# -d参数指定域名(这里直接使用泛域名证书) # --key-file 和 --fullchain-file 指定证书安装路径 # --reloadcmd参数指定nginx服务器重载配置的命令,这样在安装证书后会自动调用重载命令使网站使用新的证书 acme.sh --install-cert \ -d 17zturn.com \ --key-file /etc/ssl/17zturn.com/key.pem \ --fullchain-file /etc/ssl/17zturn.com/fullchain.pem \ --reloadcmd "systemctl reload nginx"3. 配置Nginx支持https3.1 http强制跳转https配置 http 强制跳转 https 后,这样即使在浏览器输入 http://all.17zturn.com 也会自动跳转到 https://all.17zturn.com 页面。编辑博客站点的nginx配置文件sudo vi /usr/local/nginx/conf/vhosts/typecho.conf将原来的 server 块的内容注释掉,修改后的所有内容如下server { listen 80; server_name all.17zturn.com; access_log /usr/local/nginx/logs/typecho.access.log combined; return 301 https://$server_name$request_uri; }3.2 https配置增加博客站点新的https的配置sudo vi /usr/local/nginx/conf/vhosts/typecho-https.conf编辑内容如下server { listen 443 ssl default_server; server_name all.17zturn.com; access_log /usr/local/nginx/logs/typecho.access.log combined; root /var/www/html/typecho; index index.php index.html index.htm; ssl_protocols TLSv1.1 TLSv1.2 TLSv1.3; ssl_certificate /etc/ssl/17zturn.com/fullchain.pem; ssl_certificate_key /etc/ssl/17zturn.com/key.pem; ssl_session_cache shared:SSL:1m; ssl_session_timeout 5m; ssl_ciphers ECDHE-RSA-AES128-GCM-SHA256:ECDHE:ECDH:AES:HIGH:!NULL:!aNULL:!MD5:!ADH:!RC4; ssl_prefer_server_ciphers on; if (!-e $request_filename) { rewrite ^(.*)$ /index.php$1 last; } location / { if (-f $request_filename/index.html){ rewrite (.*) $1/index.html break; } if (-f $request_filename/index.php){ rewrite (.*) $1/index.php; } if (!-f $request_filename){ rewrite (.*) /index.php; } } location ~ .*\.php(\/.*)*$ { fastcgi_pass 127.0.0.1:9000; fastcgi_index index.php; fastcgi_param SCRIPT_FILENAME $document_root$fastcgi_script_name; include fastcgi_params; } }重新加载 nginxsudo systemctl reload nginx浏览器访问 https://all.17zturn.com 能成功显示博客即说明配置成功。
-
windows脚本整理 禁止软件联网添加规则(阻止出站流量)netsh advfirewall firewall add rule name="福昕阅读器" dir=out program="C:\Program Files (x86)\Foxit Software\Foxit Reader\FoxitReader.exe" action=block禁用规则,允许出站流量netsh advfirewall firewall set rule name="福昕阅读器" new enable=no启用规则,阻止出站流量netsh advfirewall firewall set rule name="福昕阅读器" new enable=yes
-
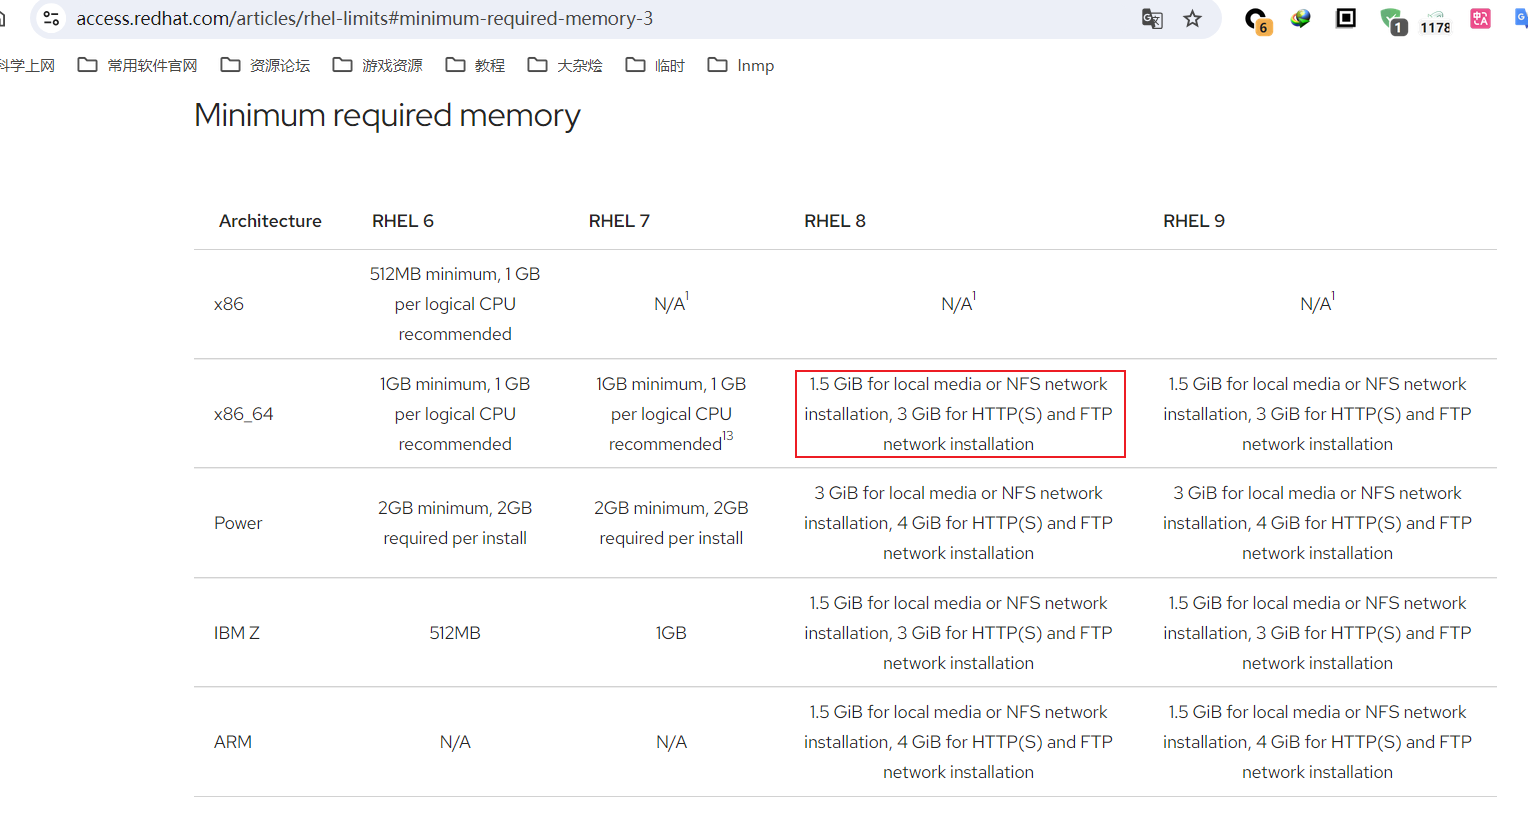
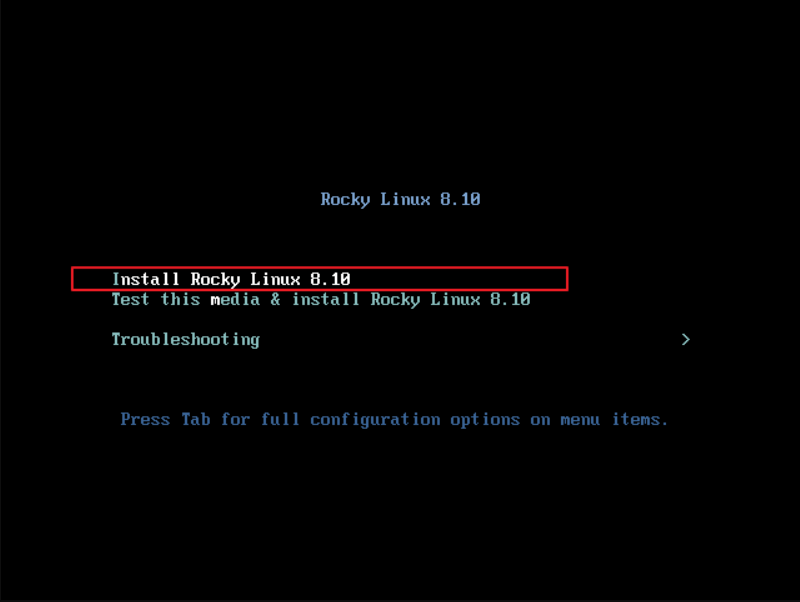
阿里云轻量应用服务器图文安装红帽系统RHEL8.10 1. 背景说明1.1. 为什么为什么要在阿里云轻量应用服务器上安装红帽系统 - Red Hat Enterprise Linux(RHEL) 8.10 ?那当然是因为爱啊!没错,就是爱折腾-...-!说正经的,起初确实是想在服务器上安装红帽系统,因为在本地计算机上学习 linux 就是用的 RHEL 8.10,也想在服务器搭建一个一样的环境,结果阿里云没有提供。。。那么装一个 CentOS Linux 8 吧,但今年六月底好像社区停止维护彻底变成 RHEL 的上游版本了,于是又想着装一个 Rocky Linux 8.10 来替代,结果发现阿里云轻量应用服务器提供的系统镜像最高只到8.6版本,由此我脑中就浮现出了一个问题:如何在云服务器安装一个厂商未提供系统镜像的系统?虽说网上有各种“VPS一键dd重装脚本”,但作为一个有“洁癖”的人,只想使用官方的镜像安装一个“纯净”的系统,那么本着折腾的精神。。。搞错了。。。是抱着学习的精神来研究解决这一问题,于是就有了这一篇文章的折腾记录。本文是选择了安装 RHEL 8.10 来演示,没有什么特殊含义,单纯就是一种尝试,给大家打个样,最终实际学习环境还是选择安装了Rocky Linux 8.10 系统。1.2. 曲折的尝试先简单说一下云服务器重装系统的原理:实际上很多 Linux 发行版都提供了支持网络安装的内核映像文件(Rocky Linux 8.10 提供的网络启动文件 vmlinuz、initrd.img),这类文件大小极小,基本只有几十M,甚至10M左右,可以配置好 GRUB 后从这两启动文件引导系统,之后即可开始安装过程,而在安装过程中所需的数据都是从网络上即时下载到内存,然后安装到硬盘,这样一来不仅不需要提前下载完整系统镜像(小则几百兆,大则几个G)就可以完成系统的部署,同时还可以指定安装过程中的自动应答文件,由人工选择变成自动执行,完成自动化安装,网上的“VPS一键dd重装脚本”对于Linux类系统的安装基本都是依靠这一原理实现。那么安装红帽系统能不能也这样做呢?理论上是支持的,因为红帽厂商提供了网络启动系统镜像(下载页面),可以从里面提取出相关启动文件(在 images/pxeboot 目录下),配置好 GRUB 后也可从网络启动安装,但前提是需要下载官方提供的完整的安装DVD ISO来搭建一个网络软件仓库,以便在安装过程中访问 BaseOS 和 AppStream 软件仓库下载安装系统所需的数据。这对于普通玩家来说无疑是困难的,没有合适的网络资源来搭建网络仓库(需要云服务器能访问到),所以基本可以直接放弃网络安装红帽系统。既然网络安装红帽系统有难度,那么我直接网络安装 Rocky Linux 8.10 试下呗!实测下来,还没有进入到图形安装界面就卡住了,直接死机了,屏幕(实际是阿里云的远程救援连接)信息输出内存空间不够了。。。这里简单提一下我的实验机器的配置:单核2G内存40G硬盘。后来查阅资料得知,网络安装红帽8系统内存要求最低为3G,参考红帽系统硬件要求说明,这两系统同源,应该有一定参考性,那么这样硬件不行那就没办法了呀!既然网络安装红帽系统不行,那么开机直接从磁盘加载整个完整的安装DVD ISO来安装系统可行吗?我为什么会有这种想法呢?因为在windows下可以这么干类似的事情,下载好官方的系统镜像后,解压出来,直接双击 setup.exe 就可以开始重装系统。基于这样的经验我就产生了类似的念头,既然 GRUB 可以自由选择启动文件,那能不能直接选择从红帽完整的安装DVD ISO启动呢?搜索一番后,发现还真的可以,主要过程记录如下:# 编辑自定义启动菜单 vi /etc/grub.d/40_custom # 添加如下启动菜单(注意删掉行首的井号注释符) (hd0,5)表示第1块磁盘的第5个分区,/dev/vda5表示的同一个分区,是镜像存放的位置 #menuentry 'Install RHEL8.10 Linux' --class gnu-linux --class gnu --class os { # loopback loop (hd0,5)/rhel-8.10-x86_64-dvd.iso # set root=(loop) # linux (loop)/isolinux/vmlinuz inst.stage2=hd:/dev/vda5 quiet # initrd (loop)/isolinux/initrd.img #} # 修改默认启动项 sed -ri 's/^GRUB_DEFAULT.*/GRUB_DEFAULT="Install RHEL8.10 Linux"/g' /etc/default/grub # 更新grub # Debian系的系统 update-grub # 红帽系的系统 grub2-mkconfig -o /boot/grub2/grub.cfg # 重启后可自动进入红帽系统安装过程 reboot不过这样真的可以安装了吗?实测是可以的,但是不能高兴的太早,有个前提是需要单独划分出一个物理分区来存放这个系统安装镜像,注意是物理分区,否则在安装过程中会出现一个问题:老系统使用的是 LVM 管理磁盘空间,逻辑卷又基本上使用的是整个磁盘,镜像文件所在的分区在使用中又不能被删除,没有办法重新释放磁盘空间,那就无法安装新系统了。即使没有使用 LVM 来管理磁盘,阿里云默认提供的镜像一般也是将系统安装到一个分区下,重新做物理分区也不太可能,进行到这一步基本也是宣告没戏了。难道只能到这里了吗?不,可能是老天觉得我太帅了,问题出现了转机。。。一天在搜索VPS一键重装系统脚本的时候,发现了一个帖子Linux一键重装支持Debian 12,Ubuntu 22.04,史上最强,这里面提到了一个方法:使用 Alpine Linux 作为中间系统来安装目标系统。作者对使用中间系统的说明在这个帖子:实现Ubuntu22.04+安装原理及我对原生网络安装及dd安装的看法1,感兴趣的看官可以自行研究下。重点就是 Alpine Linux 这个系统安装后是运行在内存里的,类似于 windows pe 环境,对磁盘可做任何操作,重新分区当然也行,然后可将当前内存里的操作系统同步到磁盘上以供后续正常启动使用,这一下就让问题有了解决方案。1.3. 最终的胜利基于上述脚本,我有了如下实验思路基于现有系统配置 GRUB 从网络安装 Alpine Linux当 Alpine Linux 启动运行在内存时,对磁盘重新分区,单独预留一个 data 分区来存放红帽系统完整的安装DVD ISO将内存中的 Alpine Linux 同步到磁盘系统分区重启后上传红帽系统完整的安装DVD ISO到 data 分区基于 Alpine Linux 系统配置 GRUB 从完整的安装DVD ISO安装 RHEL 8.102. 实验开始了2.1. 实验环境服务器配置:单核2G内存40G硬盘,实验前恢复到阿里云官方的 Rocky Linux 8.6 系统,基于该系统进行后续实验。磁盘布局:2.2. 安装中间系统 Alpine Linux下载网络启动文件到 /boot 目录下wget -O /boot/vmlinuz-virt https://mirrors.ustc.edu.cn/alpine/v3.20/releases/x86_64/netboot/vmlinuz-virtwget -O /boot/initramfs-virt https://mirrors.ustc.edu.cn/alpine/v3.20/releases/x86_64/netboot/initramfs-virt添加自定义启动菜单vi /etc/grub.d/40_custom文件尾添加如下菜单menuentry 'Install Custom Linux' --class alpinelinux --class gnu-linux --class gnu --class os { set root=(hd0,3) linux /boot/vmlinuz-virt alpine_repo=https://mirrors.ustc.edu.cn/alpine/v3.20/main/ modloop=https://mirrors.ustc.edu.cn/alpine/v3.20/releases/x86_64/netboot/modloop-virt ip=dhcp initrd /boot/initramfs-virt }注:参数(hd0,3)代表启动文件所在的位置。硬盘从0开始计数,分区从1开始计数。hd0表示第一块硬盘,即 /dev/vda ;3表示第3个分区,即 /dev/vda3 。修改默认启动项sed -ri 's/^GRUB_TIMEOUT.*/GRUB_TIMEOUT=8/g' /etc/default/grubsed -ri 's/^GRUB_DEFAULT.*/GRUB_DEFAULT="Install Custom Linux"/g' /etc/default/grub测试启动方式test -d /sys/firmware/efi && echo UEFI || echo BIOS更新 GRUB ,如若显示 BIOS 执行:grub2-mkconfig -o /boot/grub2/grub.cfg更新 GRUB ,如若显示 UEFI 执行:grub2-mkconfig -o /boot/efi/EFI/redhat/grub.cfg重启后即自动进入 Alpine Linux 安装过程reboot后续需要到阿里云远程救援连接操作,系统会自动进入 Install Custom Linux 菜单(注意:这里实测下来发现有时候还是会自动进入老系统,这时候再重新启动一下就可以自动进入Alpine Linux 安装了)Alpine Linux 启动后,直接使用 root 用户登录,无需输入密码,直接回车即可:这里提一下,当前系统是运行在内存中的,类似于 windows pe 环境,基于此我们才可以对磁盘重新分区。在分区之后,我们还可以将内存中的系统也安装到磁盘上,这一步是必须做的,否则重新分区了,磁盘上没有任何系统可以启动,后续就没法操作了,同时也安装了一个备用系统可供正常使用,避免发生意外进不去系统。正是因为 Alpine Linux 支持所有这些操作,所以我们才能进行这次实验。安装软件包apk add openssh e2fsprogs e2fsprogs-extra util-linux parted阿里云的救援连接毕竟使用起来输入不方便,简单配置一下 ssh ,便于远程登录使用sed -ri 's/^#?PermitRootLogin.*/PermitRootLogin yes/g' /etc/ssh/sshd_configsed -ri 's/^#?PermitEmptyPasswords.*/PermitEmptyPasswords yes/g' /etc/ssh/sshd_configrc-update add sshdrc-service sshd start此时可以断开阿里云的救援链接了,转为使用本地的 ssh 工具登录远程服务器了,接着进行其他配置,以下步骤中应该只用配置网络相关的即可,这里都配置了只是为了记录一下新系统的使用# 配置键盘布局 setup-keymap us us# 配置主机名 setup-hostname localhost# 生效新主机名 rc-service hostname restart# 配置网络 setup-interfaces -a# 设置开机启动网络 rc-update add networking boot# 重启网络 rc-service networking restart# 配置时区 setup-timezone Asia/Shanghai# 配置软件仓库 可直接输入15 选择的是 mirrors.ustc.edu.cn setup-apkrepos# 配置NTP服务器 setup-ntp接下来是关键步骤了,开始重新分区,需要单独划分出一个分区来存放红帽系统镜像,我这里是将最后一个分区预留出来,大概14G的空间,这里分区布局是基于40G的空间,各位看官可根据自己实际情况做合理调整# 创建命令别名,减少输入 alias p="parted -sa optimal /dev/vda"# 创建gpt分区表 p mklabel gpt# 设置pmbr_boot标志 p disk_set pmbr_boot# 创建bios_grub分区,gpt分区表下使用bios启动需要这个分区 p mkpart primary 1MiB 2MiB# 创建boot分区 p mkpart primary 2MiB 514MiB# 创建swap分区 p mkpart primary 514MiB 5GiB# 创建root分区 p mkpart primary 5GiB 26GiB# 创建data分区,存放红帽系统镜像 p mkpart primary 26GiB 100%# 设置分区标志 p set 1 bios_grub# 设置分区标志 p set 2 boot# 设置分区标志 p set 3 swap# 创建boot分区文件系统 mkfs.ext2 /dev/vda2# 创建swap分区文件系统 mkswap /dev/vda3# 创建root分区文件系统 mkfs.ext4 /dev/vda4# 创建data分区文件系统 mkfs.ext4 /dev/vda5创建挂载目录,将内存里的系统安装到 Alpine Linux 到硬盘:mkdir /mnt/rootfsmount /dev/vda4 /mnt/rootfsmkdir /mnt/rootfs/bootmount /dev/vda2 /mnt/rootfs/bootexport BOOTFS=ext2 ROOTFS=ext4 BOOTLOADER=grubsetup-disk -m sys /mnt/rootfsgrub-install /dev/vda --root-directory=/mnt/rootfs/boot重启后即可正常启动 Alpine Linuxreboot2.3. 安装目标系统 RHEL 8.10Alpine Linux 安装好了之后,分区也布局好了,接下来就可以安装红帽系统了。创建挂载目录来存放红帽系统镜像mkdir /datamount /dev/vda5 /data通过各种方式将红帽系统镜像存放到 /data 目录下。我这里通过sftp直接上传,虽说慢一点但操作简单无需额外配置。添加自定义启动菜单vi /etc/grub.d/40_custom文件尾添加如下菜单menuentry 'Install Custom Linux' --class gnu-linux --class gnu --class os { loopback loop (hd0,5)/rhel-8.10-x86_64-dvd.iso set root=(loop) linux (loop)/isolinux/vmlinuz inst.stage2=hd:/dev/vda5 quiet initrd (loop)/isolinux/initrd.img }注:参数(hd0,5)代表镜像文件所在的位置。硬盘从0开始计数,分区从1开始计数。hd0表示第一块硬盘,即 /dev/vda ;5表示第5个分区,即 /dev/vda5 。修改默认启动项sed -ri 's/^GRUB_TIMEOUT.*/GRUB_TIMEOUT=8/g' /etc/default/grubsed -ri 's/^GRUB_DEFAULT.*/GRUB_DEFAULT="Install Custom Linux"/g' /etc/default/grub更新 GRUBupdate-grub重启后即自动进入 Red Hat Enterprise Linux 8.10 安装过程,后续需要连接到阿里云的救援链接操作reboot安装红帽系统,详细步骤略,这里主要记录以下磁盘的操作选择自定义配置删除老系统的root分区删除老系统的bios_grub分区创建新系统的bios_grub分区创建新系统的boot分区创建新系统的swap分区创建新系统的root分区分区布局,注意这里root分区使用LVM管理比较合适,因为后续安装完成不想要保留系统镜像了可以删除并将之前分配的data分区通过LVM合并到root分区,或做其他部署,使用起来更加灵活方便汇总界面至此即可点击开始安装继续了!
-
Navicat 官网地址英文网页: https://www.navicat.com/en/中文网页: https://www.navicat.com.cn/下载地址版本平台架构链接备注16.3最新版windowsx64navicat163_premium_cs_x64.exe中文版16.3最新版macOSx64navicat163_premium_cs.dmg中文版16.2最新版windowsx64navicat162_premium_cs_x64.exe中文版16.2最新版macOSx64navicat162_premium_cs.dmg中文版16.1最新版windowsx64navicat161_premium_cs_x64.exe中文版16.1最新版macOSx64navicat161_premium_cs.dmg中文版16.0最新版windowsx64navicat160_premium_cs_x64.exe中文版16.0最新版macOSx64navicat160_premium_cs.dmg中文版15.0最新版windowsx64navicat150_premium_cs_x64.exe中文版15.0最新版macOSx64navicat150_premium_cs.dmg中文版2024-09-24 21:45:36 星期二
-
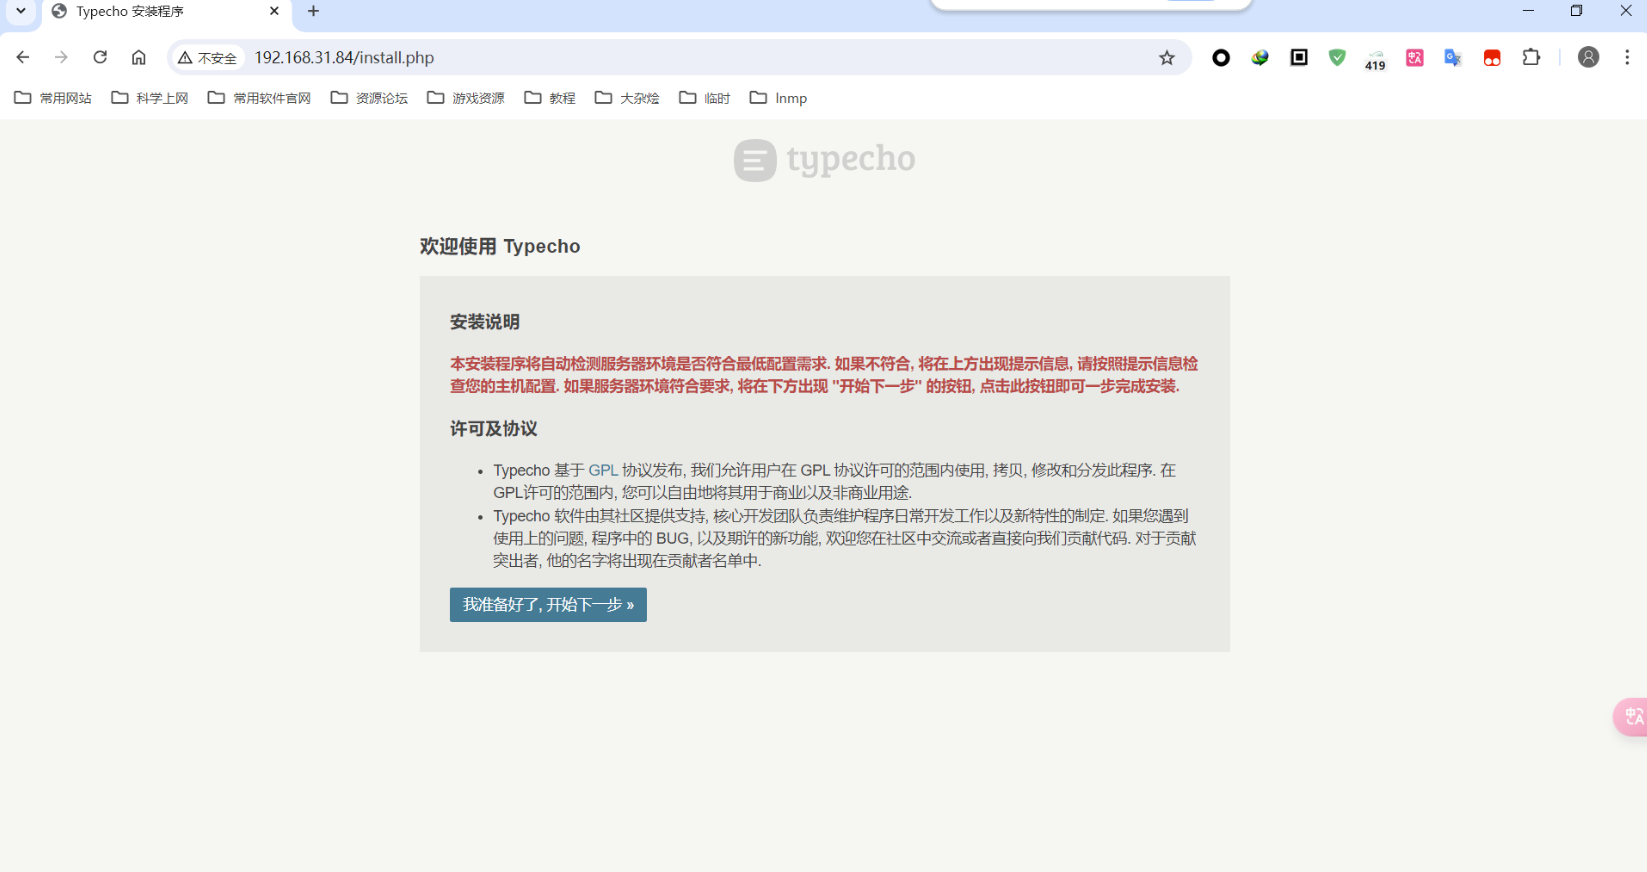
基于LNMP环境搭建Typecho博客 1. 搭建LNMP环境具体搭建步骤参考之前的文章: 基于Rocky Linux 8.10系统使用源码搭建LNMP环境,附加安装SQLite2. 部署Typecho博客2.1 下载创建工作区目录mkdir -p /home/devuser/workspace/typecho下载wget -P /home/devuser/workspace/typecho https://github.com/typecho/typecho/releases/download/v1.2.1/typecho.zip2.2 安装创建网站根目录sudo mkdir -p /var/www/html/typecho解压博客程序到网站根目录sudo unzip /home/devuser/workspace/typecho/typecho.zip -d /var/www/html/typecho/修改网站目录所有者为 www-data,否则后续安装会出现各种权限问题sudo chown -R www-data:www-data /var/www/html/typecho/配置 nginx,先删除默认站点设置sudo rm /usr/local/nginx/conf/vhosts/defautl.conf创建博客站点配置文件sudo vi /usr/local/nginx/conf/vhosts/typecho.conf内容如下server { listen 80; server_name localhost; access_log /usr/local/nginx/logs/typecho.access.log combined; root /var/www/html/typecho; index index.php index.html index.htm; if (!-e $request_filename) { rewrite ^(.*)$ /index.php$1 last; } location / { if (-f $request_filename/index.html){ rewrite (.*) $1/index.html break; } if (-f $request_filename/index.php){ rewrite (.*) $1/index.php; } if (!-f $request_filename){ rewrite (.*) /index.php; } } location ~ .*\.php(\/.*)*$ { fastcgi_pass 127.0.0.1:9000; fastcgi_index index.php; fastcgi_param SCRIPT_FILENAME $document_root$fastcgi_script_name; include fastcgi_params; } }检测配置文件是否有无问题sudo /usr/local/nginx/sbin/nginx -t重新加载 nginxsudo systemctl reload nginx.service浏览器访问 http://192.168.31.84 (需替换自己实际服务器ip)出现如下安装页面即可开始安装 Typecho 博客程序点击开始下一步,出现如下页面如果选用 MySQL 数据库,可以参考 基于Rocky Linux 8.10系统使用源码搭建LNMP环境,附加安装SQLite 这一文章中使用 MySQL 创建测试数据库的例子来创建实际使用的数据库,然后将其参数依次填入表格即可(注意:实测数据库地址需要输入 127.0.0.1 方可正常使用)。这里为方便演示安装过程,我选择使用 SQLite 数据库做演示点击开始安装,出现如下页面按实际情况填写后点击继续安装即可出现如下页面即表示安装成功3. 主题&插件Joe主题项目地址https://github.com/HaoOuBa克隆项目到博客主题目录下,再在后台启用即可sudo git clone https://github.com/HaoOuBa/Joe.git /var/www/html/typecho/usr/themes/ # github有时连不上,已同步7.7.1版本到本人国内gitee仓库 # sudo git clone https://gitee.com/nopoetry/Joe /var/www/html/typecho/usr/themes/安装后问题首页出现 PHP 错误提示Deprecated: strpos(): Passing null to parameter #1 ($haystack) of type string is deprecated in /var/www/html/typecho/usr/themes/Joe/public/config.php on line 19 Deprecated: strpos(): Passing null to parameter #1 ($haystack) of type string is deprecated in /var/www/html/typecho/usr/themes/Joe/public/config.php on line 20 Deprecated: strpos(): Passing null to parameter #1 ($haystack) of type string is deprecated in /var/www/html/typecho/usr/themes/Joe/public/config.php on line 21 Deprecated: strpos(): Passing null to parameter #1 ($haystack) of type string is deprecated in /var/www/html/typecho/usr/themes/Joe/public/config.php on line 22 Deprecated: strpos(): Passing null to parameter #1 ($haystack) of type string is deprecated in /var/www/html/typecho/usr/themes/Joe/public/config.php on line 23因为当前 LNMP 系统使用的是 PHP 8.2.22 版本,而 PHP 8.0 版本之后 strpos 函数第一个参数不允许传递 null,所以出现此信息。根据信息查看源码后做出如下优化即可解决编辑报错文件sudo vi /var/www/html/typecho/usr/themes/Joe/public/config.php找到对应部分做如下修改<?php $fontUrl = $this->options->JCustomFont; if (isset($fontUrl) && !empty($fontUrl)) { if (strpos($fontUrl, 'woff2') !== false) $fontFormat = 'woff2'; elseif (strpos($fontUrl, 'woff') !== false) $fontFormat = 'woff'; elseif (strpos($fontUrl, 'ttf') !== false) $fontFormat = 'truetype'; elseif (strpos($fontUrl, 'eot') !== false) $fontFormat = 'embedded-opentype'; elseif (strpos($fontUrl, 'svg') !== false) $fontFormat = 'svg'; } ?>评论出现 PHP 错误提示Warning: Trying to access array offset on value of type null in /var/www/html/typecho/usr/themes/Joe/core/function.php on line 261因为当前搭建的 LNMP 环境使用的是 PHP 8.2.22 版本,而 PHP 8.0 版本之后不允许尝试访问类型为 null 的值的数组偏移量,所以出现此信息。根据信息查看源码后做出如下优化即可解决编辑报错文件sudo vi /var/www/html/typecho/usr/themes/Joe/core/function.php找到对应部分做如下修改function _getParentReply($parent) { if ($parent !== "0") { $db = Typecho_Db::get(); $commentInfo = $db->fetchRow($db->select('author')->from('table.comments')->where('coid = ?', $parent)); if (isset($commentInfo['author']) && !empty($commentInfo['author'])) echo '<div class="parent"><span style="vertical-align: 1px;">@</span> ' . $commentInfo['author'] . '</div>'; } }MenuTree目录插件,基于Joe主题安装左侧边栏目录项目地址https://github.com/typecho-fans/plugins/tree/master/MenuTree下载地址https://github.com/typecho-fans/plugins/releases/download/plugins-M_to_R/MenuTree.zip使用方法:下载本插件,放在 usr/plugins/ 目录中,确保文件夹名为 MenuTree;激活插件,设置内可开关“嵌入模式”即文章标签输出,“独立模式”即模板函数输出;“嵌入模式”勾选时,编辑文章用按钮插入或手写 标签发布即可显示目录树;“独立模式”勾选时,修改模板文件如 post.php 中写入 <?php $this->treeMenu(); ?> 也可显示。注意事项:插件仅输出html不带css,请根据以下class命名自行处理样式: .index-menu 容器 div .index-menu-list 列表 ul .index-menu-item 列表项 li .index-menu-link 列表项链接 a .menu-target-fix {display:block; position:relative; top:-60px; //偏移量} 锚点跳转定位结合Joe主题使用创建 menutree.css 文件sudo vi /var/www/html/typecho/usr/themes/Joe/assets/css/menutree.css添加如下内容.menutree { position:sticky; top:60px; width:15%; margin:15px 15px 15px 0px; /* 溢出内容添加滚动条 */ overflow-y:auto; overflow-x:auto; background: var(--background); } /** 父元素<ul>与其中的子元素<li> **/ .index-menu-item { margin: 10px 0px; } .index-menu-list { margin: 5px 0px 5px 10px; } /** 所有<a>标签 **/ .index-menu-link{ color: var(--main); transition:all 0.2s ease-in-out 0s; padding:5px 0px; } .index-menu-link:hover { color: var(--theme); text-shadow: var(--text-shadow); font-weight:500; background-color:#efefef; } /* 锚点跳转定位 */ .menu-target-fix { display: block; position: relative; /* 偏移量 */ top:-100px; } /* 在宽度小于1000px的设备上隐藏短划线,以使目录的标题正常显示 */ @media screen and (max-width:1000px) { .joe_aside__item-title > .line { display:none; } } /* 在宽度小于800px的设备上隐藏目录侧边栏 */ @media screen and (max-width:800px) { .menutree{ display:none; } }创建 menutree.js 文件sudo vi /var/www/html/typecho/usr/themes/Joe/assets/js/menutree.js添加如下内容/* 获取渲染好的目录的高度 */ menuHeight = document.getElementsByClassName("index-menu")[0].offsetHeight; /* 获取容器高度 */ containHeight = document.getElementsByClassName("joe_aside__item-contain")[0].offsetHeight; /* 获取容器 title 的高度 */ titleHeight = document.getElementsByClassName("joe_aside__item-title")[0].offsetHeight; /* 获取整个目录侧边栏对象 */ aside = document.getElementsByClassName("menutree")[0]; // 定义一个函数来修改目录的显示长度,从而使侧边栏能自适应目录的高度,避免出现大片空白部分 function changeMenuHeight(){ /* 调整容器高度 */ aside.style.height = titleHeight + containHeight + "px"; } // 如果目录的高度小于500px,调用函数将目录修改为实际高度,反之则将侧边栏的高度固定为500px if(menuHeight < 500){ changeMenuHeight(); } else { aside.style.height = "500px"; }修改 Joe 主题的 post.php 文件在 <head> 与 </head> 标签中插入以下代码<!-- 导入目录的css文件 --> <link rel="stylesheet" href="<?php $this->options->themeUrl('assets/css/menutree.css'); ?>">在 <div class="joe_container"> 与 <div class="joe_main joe_post"> 标签中插入以下代码 <!-- 文章目录代码 --> <section class="joe_aside__item menutree"> <div class="joe_aside__item-title"> <svg t="1642997936013" class="icon" viewBox="0 0 1024 1024" version="1.1" xmlns="http://www.w3.org/2000/svg" p-id="2169" width="128" height="128"><path d="M838.3 895.9H197.9c-53.9 0-97.7-43.8-97.7-97.7V236.7c0-53.9 43.8-97.7 97.7-97.7h640.3c53.9 0 97.7 43.8 97.7 97.7v561.4c0.1 53.9-43.7 97.8-97.6 97.8zM197.9 203.8c-18.1 0-32.9 14.8-32.9 32.9v561.4c0 18.1 14.8 32.9 32.9 32.9h640.3c18.1 0 32.9-14.8 32.9-32.9V236.7c0-18.1-14.8-32.9-32.9-32.9H197.9z" fill="#666666" p-id="2170"></path><path d="M695.1 455.2H341.2c-17.9 0-32.4-14.5-32.4-32.4s14.5-32.4 32.4-32.4h353.9c17.9 0 32.4 14.5 32.4 32.4s-14.5 32.4-32.4 32.4zM695.1 578.2H341.2c-17.9 0-32.4-14.5-32.4-32.4s14.5-32.4 32.4-32.4h353.9c17.9 0 32.4 14.5 32.4 32.4s-14.5 32.4-32.4 32.4zM695.1 701.2H341.2c-17.9 0-32.4-14.5-32.4-32.4s14.5-32.4 32.4-32.4h353.9c17.9 0 32.4 14.5 32.4 32.4s-14.5 32.4-32.4 32.4zM379.1 281.1c-17.9 0-32.4-14.5-32.4-32.4V115.4c0-17.9 14.5-32.4 32.4-32.4s32.4 14.5 32.4 32.4v133.2c0 17.9-14.5 32.5-32.4 32.5zM657.1 281.1c-17.9 0-32.4-14.5-32.4-32.4V115.4c0-17.9 14.5-32.4 32.4-32.4s32.4 14.5 32.4 32.4v133.2c0 17.9-14.5 32.5-32.4 32.5z" fill="#666666" p-id="2171"></path></svg> <span class="text">目录</span> <span class="line"></span> </div> <div class="joe_aside__item-contain"> <?php $this->treeMenu(); ?> </div> </section> <!-- 导入的js文件,必须在这里导入,否则不生效 --> <script src="<?php $this->options->themeUrl('assets/js/menutree.js'); ?>"></script>基于Prism的代码高亮(仅默认主题适用以下方法)Prism 是一个轻量级,可扩展的语法着色工具。非常易于使用,只需要插入一个 CSS 和 JS 文件即可。项目地址https://github.com/PrismJS/prism主页https://prismjs.com/下载地址https://prismjs.com/download.html以下为官网下载好的文件,主题为默认,语言选择所有,插件选择显示行号、显示语言名字、代码复制prism.jsprism.css使用方式下载上面两个文件并放到网站主题根目录下,这里演示的目录为 /var/www/html/typecho/usr/themes/default/修改主题的 header.php 文件sudo vi /var/www/html/typecho/usr/themes/default/header.php在 <head> 与 </head> 标签中插入如下代码<link rel="stylesheet" href="<?php $this->options->themeUrl('prism.css');?>"> <script src="<?php $this->options->themeUrl('prism.js');?>"></script>在 <body> 标签中修改为如下代码以支持行号显示:<body class="line-numbers">ShortLinks短链Typecho 外链转内链插件,支持正文和评论者链接。项目地址https://github.com/benzBrake/ShortLinks使用方式克隆项目到博客插件目录再在博客后台启用即可sudo git clone https://github.com/benzBrake/ShortLinks.git /var/www/html/typecho/usr/plugins/FontLibs字体设置项目地址https://github.com/xxhzm/FontLibs下载地址https://github.com/xxhzm/FontLibs/archive/refs/tags/1.0.3.zip下载到博客插件目录再在博客后台启用即可
-
基于Rocky Linux 8.10系统使用源码搭建LNMP环境,附加安装SQLite 1. 环境说明标识说明相关链接LRocky Linux x86_64官方网站下载页面8.10 DVD版镜像下载地址8.10 Boot版镜像下载地址8.10 Mininal版镜像下载地址NNginx官方网站下载页面1.26.1下载地址MMySQL x86_64官方网站社区版下载页面8.0.39下载地址8.4.2LTS下载地址PPHP官方网站7.4.33下载地址8.2.22下载地址SSQLite官方网站下载页面3.46.0下载地址2. Rocky Linux此处使用 Rocky-8.10-x86_64-boot.iso 镜像进行网络安装,这样可同步软件仓库安装最新版本。国内镜像下载地址:mirrors.ustc.edu.cn Rocky-8.10-x86_64-boot.iso2.1. 虚拟机安装过程演示安装系统启动界面选择安装界面语言安装位置 Installation Destination网络配置 Network & Host Name软件安装源 Installation Source选择 https,输入 mirrors.ustc.edu.cn/rocky/8.10/BaseOS/x86_64/os软件选择 Software Selection语言支持 Language Support时间 Time & Date设置root用户密码 Root Password安装信息汇总 Installation Summary开始安装 Begin Installation完成安装2.2. 系统简单配置添加 devuser 用户,并自动创建家目录 /home/devuser,这里可以按各自喜好自定义用户名,不推荐直接使用 root 用户操作命令useradd devuser -m -s /bin/bash修改密码passwd devuser添加到用户组 wheel 以便后续使用 sudo 命令来执行一些需要管理员权限的命令usermod -aG wheel devuser注:后续操作登录到用户 devuser 执行,需要管理员权限的命令使用 sudo 执行配置 EPEL 软件仓库sudo dnf config-manager --set-enabled powertoolssudo dnf install https://dl.fedoraproject.org/pub/epel/epel-release-latest-8.noarch.rpm安装基本开发工具sudo dnf install gcc gcc-c++ gdb make cmake automake autoconf perl perl-devel python36 python36-devel git vim创建工作区目录mkdir -p /home/devuser/workspace/lnmp3. Nginx3.1. 安装下载wget -P /home/devuser/workspace/lnmp/ https://nginx.org/download/nginx-1.26.1.tar.gz解压tar -xf /home/devuser/workspace/lnmp/nginx-1.26.1.tar.gz -C /home/devuser/workspace/lnmp/安装依赖包sudo dnf install pcre pcre-utf16 pcre-utf32 pcre-devel \ pcre2 pcre2-utf16 pcre2-utf32 pcre2-devel openssl openssl-devel \ libxml2 libxml2-devel libxslt libxslt-devel gd gd-devel \ GeoIP GeoIP-devel gperftools gperftools-devel \ libatomic_ops libatomic_ops-devel编译配置cd /home/devuser/workspace/lnmp/nginx-1.26.1/./configure --prefix=/usr/local/nginx --builddir=build-out \ --user=www-data --group=www-data \ --with-select_module --with-poll_module --with-threads --with-file-aio \ --with-http_ssl_module --with-http_v2_module --with-http_v3_module \ --with-http_realip_module --with-http_addition_module \ --with-http_xslt_module=dynamic \ --with-http_image_filter_module=dynamic \ --with-http_geoip_module=dynamic \ --with-http_sub_module --with-http_dav_module --with-http_flv_module \ --with-http_mp4_module --with-http_gunzip_module \ --with-http_gzip_static_module \ --with-http_auth_request_module --with-http_random_index_module \ --with-http_secure_link_module --with-http_degradation_module \ --with-http_slice_module --with-http_stub_status_module \ --with-http_perl_module=dynamic --with-mail=dynamic --with-mail_ssl_module \ --with-stream=dynamic --with-stream_ssl_module --with-stream_realip_module \ --with-stream_geoip_module=dynamic --with-stream_ssl_preread_module \ --with-google_perftools_module --with-cpp_test_module \ --with-compat --with-pcre --with-libatomic编译make安装sudo make install3.2. 配置添加 www-data 用户sudo useradd www-data -M -s /sbin/nologin创建虚拟主机配置文件夹,便于分别管理sudo mkdir /usr/local/nginx/conf/vhosts编辑 nginx 主配置文件sudo vi /usr/local/nginx/conf/nginx.conf修改内容如下 user www-data www-data; worker_processes auto; error_log /usr/local/nginx/logs/error.log; #error_log /usr/local/nginx/logs/error.log notice; #error_log /usr/local/nginx/logs/error.log info; pid /usr/local/nginx/logs/nginx.pid; events { worker_connections 1024; } http { include /usr/local/nginx/conf/mime.types; default_type application/octet-stream; log_format main '$remote_addr - $remote_user [$time_local] "$request" ' '$status $body_bytes_sent "$http_referer" ' '"$http_user_agent" "$http_x_forwarded_for"'; access_log /usr/local/nginx/logs/access.log main; sendfile on; tcp_nopush on; #keepalive_timeout 0; keepalive_timeout 65; gzip on; include /usr/local/nginx/conf/vhosts/*.conf; }添加默认虚拟主机配置(实际是拷贝的默认配置,只是简单做了个拆分)sudo vi /usr/local/nginx/conf/vhosts/defautl.conf内容如下server { listen 80; server_name localhost; #charset koi8-r; #access_log logs/host.access.log main; location / { root html; index index.html index.htm; } #error_page 404 /404.html; # redirect server error pages to the static page /50x.html # error_page 500 502 503 504 /50x.html; location = /50x.html { root html; } # proxy the PHP scripts to Apache listening on 127.0.0.1:80 # #location ~ \.php$ { # proxy_pass http://127.0.0.1; #} # pass the PHP scripts to FastCGI server listening on 127.0.0.1:9000 # #location ~ \.php$ { # root html; # fastcgi_pass 127.0.0.1:9000; # fastcgi_index index.php; # fastcgi_param SCRIPT_FILENAME /scripts$fastcgi_script_name; # include fastcgi_params; #} # deny access to .htaccess files, if Apache's document root # concurs with nginx's one # #location ~ /\.ht { # deny all; #} } # another virtual host using mix of IP-, name-, and port-based configuration # #server { # listen 8000; # listen somename:8080; # server_name somename alias another.alias; # location / { # root html; # index index.html index.htm; # } #} # HTTPS server # #server { # listen 443 ssl; # server_name localhost; # ssl_certificate cert.pem; # ssl_certificate_key cert.key; # ssl_session_cache shared:SSL:1m; # ssl_session_timeout 5m; # ssl_ciphers HIGH:!aNULL:!MD5; # ssl_prefer_server_ciphers on; # location / { # root html; # index index.html index.htm; # } #}检测配置文件是否有无问题sudo /usr/local/nginx/sbin/nginx -t编写 systemd 脚本,以便后续管理服务sudo vi /usr/lib/systemd/system/nginx.service内容如下[Unit] Description=The nginx HTTP and reverse proxy server After=network.target remote-fs.target nss-lookup.target [Service] Type=forking PIDFile=/usr/local/nginx/logs/nginx.pid ExecStartPre=/usr/bin/rm -f /usr/local/nginx/logs/nginx.pid ExecStartPre=/usr/local/nginx/sbin/nginx -t ExecStart=/usr/local/nginx/sbin/nginx ExecReload=/usr/local/nginx/sbin/nginx -s reload ExecStop=/usr/local/nginx/sbin/nginx -s quit RestartSec=20 Restart=always [Install] WantedBy=multi-user.target设置开机启动sudo systemctl enable nginx.service启动服务sudo systemctl start nginx.service开启了 firewalld 防火墙的系统需要放行 http 、https 流量sudo firewall-cmd --permanent --zone=public --add-service=httpsudo firewall-cmd --permanent --zone=public --add-service=httpssudo firewall-cmd --reload浏览器访问 http://192.168.31.84 (需替换自己实际服务器ip)出现如下欢迎页面即表示安装成功4. MySQL4.1. 安装下载wget -P /home/devuser/workspace/lnmp/ https://dev.mysql.com/get/Downloads/MySQL-8.0/mysql-8.0.39-linux-glibc2.28-x86_64.tar.xz解压sudo tar -xf /home/devuser/workspace/lnmp/mysql-8.0.39-linux-glibc2.28-x86_64.tar.xz -C /usr/local/创建一个短文件名的软连接,方便输入sudo ln -s /usr/local/mysql-8.0.39-linux-glibc2.28-x86_64/ /usr/local/mysql4.2. 配置添加 mysql 用户sudo useradd mysql -M -s /sbin/nologin创建数据库目录sudo mkdir /usr/local/mysql/data修改数据库目录所有者为 mysql 用户sudo chown -R mysql:mysql /usr/local/mysql/data/编辑数据库配置文件 my.cnfsudo vi /etc/my.cnf内容如下,其中 basedir 代表 mysql 安装的目录, datadir 代表之前创建的数据库目录,参数需按实际情况修改[client] port = 3306 socket = /tmp/mysql.sock [mysql] port = 3306 socket = /tmp/mysql.sock [mysqld_safe] user = mysql port = 3306 basedir = /usr/local/mysql datadir = /usr/local/mysql/data socket = /tmp/mysql.sock pid_file = /tmp/mysql.pid log_error = /usr/local/mysql/data/error.log [mysqld] user = mysql port = 3306 server_id = 1 basedir = /usr/local/mysql datadir = /usr/local/mysql/data socket = /tmp/mysql.sock pid_file = /tmp/mysql.pid character_set_server = utf8mb4 collation-server = utf8mb4_unicode_ci init_connect = 'SET NAMES utf8mb4' skip_name_resolve = ON default_time_zone = '+8:00' explicit-defaults-for-timestamp = ON tls-version = TLSv1.2 lower-case-table-names = 1 max_allowed_packet = 16M #performance setttings lock_wait_timeout = 3600 open_files_limit = 65535 back_log = 1024 max_connections = 512 max_connect_errors = 1000000 table_open_cache = 1024 table_definition_cache = 1024 thread_stack = 512K sort_buffer_size = 16M join_buffer_size = 16M read_buffer_size = 8M read_rnd_buffer_size = 16M bulk_insert_buffer_size = 64M thread_cache_size = 768 interactive_timeout = 600 wait_timeout = 600 tmp_table_size = 96M max_heap_table_size = 96M #log settings log_timestamps = SYSTEM log_error = /usr/local/mysql/data/error.log log_error_verbosity = 3 slow_query_log = ON slow_query_log_file = /usr/local/mysql/data/slow.log long_query_time = 0.5 log_queries_not_using_indexes = ON log_throttle_queries_not_using_indexes = 60 min_examined_row_limit = 100 log_slow_admin_statements = ON log_slow_slave_statements = ON log_bin = /usr/local/mysql/data/mybinlog binlog_format = ROW sync_binlog = 1 binlog_cache_size = 4M max_binlog_cache_size = 2G max_binlog_size = 1G binlog_rows_query_log_events = ON binlog_expire_logs_seconds = 604800 #expire_logs_days = 7 binlog_checksum = CRC32 gtid_mode = ON enforce_gtid_consistency = TRUE #myisam settings key_buffer_size = 15M myisam_sort_buffer_size = 128M [mysqldump] quick初始化数据库sudo /usr/local/mysql/bin/mysqld --defaults-file=/etc/my.cnf --initialize --user=mysql执行完后无任何输出,查看日志sudo vi /usr/local/mysql/data/error.log查找 password 关键字有如下信息即表示数据库初始化成功,此时 root 用户的临时密码为 cJ1p/Tf4Q5Bt2024-08-04T01:10:30.696376Z 6 [Note] [MY-010454] [Server] A temporary password is generated for root@localhost: cJ1p/Tf4Q5Bt编写 systemd 脚本,以便后续管理服务sudo vi /usr/lib/systemd/system/mysqld.service内容如下[Unit] Description=MySQL 8.0.39 database server After=syslog.target network.target [Service] Type=forking User=mysql Group=mysql ExecStart=/usr/local/mysql/support-files/mysql.server start ExecStop=/usr/local/mysql/support-files/mysql.server stop ExecReload=/usr/local/mysql/support-files/mysql.server restart RestartSec=300 Restart=always [Install] WantedBy=multi-user.target修改 mysql.server 脚本sudo vi /usr/local/mysql/support-files/mysql.server按需修改以下参数,需与 my.cnf 里的参数一致basedir=/usr/local/mysql datadir=/usr/local/mysql/data mysqld_pid_file_path=/tmp/mysql.pid设置开机启动sudo systemctl enable mysqld.service启动服务sudo systemctl start mysqld.service执行安全安装/usr/local/mysql/bin/mysql_secure_installation4.3. 创建测试数据库在本地以 root 用户登录数据库/usr/local/mysql/bin/mysql -u root -p创建数据库名为 test_db 的测试数据库create database if not exists test_db default charset utf8mb4 collate utf8mb4_unicode_ci;创建用户名为 test_user,密码为 test_user@test_db 的测试用户create user 'test_user'@'%' identified by 'test_user@test_db';授予操作权限grant all privileges on test_db.* to 'test_user'@'%';更新权限flush privileges;5. SQLite5.1. 安装下载wget -P /home/devuser/workspace/lnmp/ https://www.sqlite.org/2024/sqlite-autoconf-3460000.tar.gz解压tar -xf /home/devuser/workspace/lnmp/sqlite-autoconf-3460000.tar.gz -C /home/devuser/workspace/lnmp/编译配置cd /home/devuser/workspace/lnmp/sqlite-autoconf-3460000/./configure --prefix=/usr/local/sqlite --exec-prefix=/usr/local/sqlite \ --libdir=/usr/local/lib64 --enable-shared --enable-static \ --enable-readline --enable-threadsafe \ --enable-dynamic-extensions --enable-math \ --enable-fts4 --enable-fts3 --enable-fts5 --enable-rtree \ --enable-session --enable-static-shell编译make安装sudo make install6. PHP6.1. 安装下载wget -P /home/devuser/workspace/lnmp/ https://www.php.net/distributions/php-8.2.22.tar.gz解压tar -xf /home/devuser/workspace/lnmp/php-8.2.22.tar.gz -C /home/devuser/workspace/lnmp/安装依赖包sudo dnf install systemd systemd-devel curl libcurl-devel \ enchant enchant-devel libffi-devel libavif libavif-devel libavif-tools \ gmp gmp-devel icu libicu-devel openldap openldap-devel \ oniguruma oniguruma-devel aspell aspell-devel readline readline-devel \ ncurses ncurses-devel net-snmp net-snmp-devel libsodium libsodium-devel \ argon2 libargon2 libargon2-devel tidy libtidy libtidy-devel \ zip libzip libzip-devel libzip-tools编译配置cd /home/devuser/workspace/lnmp/php-8.2.22/./configure --prefix=/usr/local/php/8.2.22 \ --exec-prefix=/usr/local/php/8.2.22 \ --enable-embed --enable-fpm --with-fpm-user=www-data \ --with-fpm-group=www-data --with-fpm-systemd \ --enable-phpdbg --enable-phpdbg-readline --enable-zts --enable-sigchild \ --with-openssl --with-kerberos --with-system-ciphers \ --with-zlib --enable-bcmath --with-bz2 --enable-calendar \ --with-curl --with-enchant --enable-exif --with-ffi \ --enable-ftp --with-openssl-dir --enable-gd --with-avif --with-webp \ --with-jpeg --with-xpm --with-freetype --enable-gd-jis-conv \ --with-gettext --with-gmp --with-mhash --enable-intl \ --with-ldap --with-ldap-sasl --enable-mbstring --with-mysqli \ --with-mysql-sock --enable-pcntl --with-pdo-mysql --with-zlib-dir \ --with-pspell --with-pdo-sqlite --with-readline --enable-shmop \ --with-snmp --enable-soap --enable-sockets --with-sodium \ --with-password-argon2 --enable-sysvmsg --enable-sysvsem --enable-sysvshm \ --with-tidy --with-xsl --enable-zend-test --with-zip --enable-mysqlnd \ --with-pear PKG_CONFIG_PATH=/usr/local/lib64/pkgconfig:$PKG_CONFIG_PATH \ --with-libdir=lib64编译make -j4编译测试make test安装sudo make install6.2. 配置复制 php.ini 配置文件sudo cp /home/devuser/workspace/lnmp/php-8.2.22/php.ini-development /usr/local/php/8.2.22/lib/php.ini编辑 php.ini 配置文件sudo vi /usr/local/php/8.2.22/lib/php.ini以下参数按需修改date.timezone = Asia/Shanghai upload_max_filesize = 10M post_max_size = 10M memory_limit = 256M include_path = ".:/usr/local/php/8.2.22/include:/usr/local/php/8.2.22/lib/php" disable_functions = passthru,exec,system,chroot,chgrp,chown,shell_exec,proc_open,proc_get_status,popen,ini_alter,ini_restore,dl,openlog,syslog,readlink,symlink,popepassthru,stream_socket_server复制 php-fpm 相关配置文件sudo cp /usr/local/php/8.2.22/etc/php-fpm.conf.default /usr/local/php/8.2.22/etc/php-fpm.confsudo cp /usr/local/php/8.2.22/etc/php-fpm.d/www.conf.default /usr/local/php/8.2.22/etc/php-fpm.d/www.conf复制 systemd 脚本(启用 --with-fpm-systemd 参数后编译自动生成该脚本)sudo cp /home/devuser/workspace/lnmp/php-8.2.22/sapi/fpm/php-fpm.service /usr/lib/systemd/system/修改脚本 ProtectSystem 参数,否则后续无法启动sudo vi /usr/lib/systemd/system/php-fpm.service参数修改为如下ProtectSystem=off设置开机启动sudo systemctl enable php-fpm.service启动服务sudo systemctl start php-fpm.service7. 测试编写测试网页sudo vi /usr/local/nginx/html/test.php内容如下<?php phpinfo(); ?>配置 nginx 以支持 phpsudo cp /usr/local/nginx/conf/vhosts/defautl.conf /usr/local/nginx/conf/vhosts/defautl.conf.baksudo vi /usr/local/nginx/conf/vhosts/defautl.conf修改后的内容如下server { listen 80; server_name localhost; #charset koi8-r; #access_log logs/host.access.log main; location / { root html; index index.html index.htm; } #error_page 404 /404.html; # redirect server error pages to the static page /50x.html # error_page 500 502 503 504 /50x.html; location = /50x.html { root html; } # proxy the PHP scripts to Apache listening on 127.0.0.1:80 # #location ~ \.php$ { # proxy_pass http://127.0.0.1; #} # pass the PHP scripts to FastCGI server listening on 127.0.0.1:9000 # location ~ \.php$ { root html; fastcgi_pass 127.0.0.1:9000; fastcgi_index index.php; fastcgi_param SCRIPT_FILENAME $document_root$fastcgi_script_name; include fastcgi_params; } # deny access to .htaccess files, if Apache's document root # concurs with nginx's one # #location ~ /\.ht { # deny all; #} } # another virtual host using mix of IP-, name-, and port-based configuration # #server { # listen 8000; # listen somename:8080; # server_name somename alias another.alias; # location / { # root html; # index index.html index.htm; # } #} # HTTPS server # #server { # listen 443 ssl; # server_name localhost; # ssl_certificate cert.pem; # ssl_certificate_key cert.key; # ssl_session_cache shared:SSL:1m; # ssl_session_timeout 5m; # ssl_ciphers HIGH:!aNULL:!MD5; # ssl_prefer_server_ciphers on; # location / { # root html; # index index.html index.htm; # } #} 重新加载 nginx 配置sudo systemctl reload nginx浏览器访问 http://192.168.31.84/test.php (需替换自己实际服务器ip)出现如下php页面即表示安装成功8. 出现的问题及解决方法汇总8.1. 编译类8.1.1. nginx问题1:checking for PCRE2 library ... not found checking for PCRE library ... not found checking for PCRE library in /usr/local/ ... not found checking for PCRE library in /usr/include/pcre/ ... not found checking for PCRE library in /usr/pkg/ ... not found checking for PCRE library in /opt/local/ ... not found checking for PCRE library in /opt/homebrew/ ... not found ./configure: error: the HTTP rewrite module requires the PCRE library. You can either disable the module by using --without-http_rewrite_module option, or install the PCRE library into the system, or build the PCRE library statically from the source with nginx by using --with-pcre=<path> option.解决:sudo dnf install pcre pcre-utf16 pcre-utf32 pcre-devel pcre2 pcre2-utf16 pcre2-utf32 pcre2-devel问题2:checking for OpenSSL library ... not found checking for OpenSSL library in /usr/local/ ... not found checking for OpenSSL library in /usr/pkg/ ... not found checking for OpenSSL library in /opt/local/ ... not found checking for OpenSSL library in /opt/homebrew/ ... not found ./configure: error: SSL modules require the OpenSSL library. You can either do not enable the modules, or install the OpenSSL library into the system, or build the OpenSSL library statically from the source with nginx by using --with-openssl=<path> option.解决:sudo dnf install openssl openssl-devel问题3:checking for libxslt ... not found checking for libxslt in /usr/local/ ... not found checking for libxslt in /usr/pkg/ ... not found checking for libxslt in /opt/local/ ... not found ./configure: error: the HTTP XSLT module requires the libxml2/libxslt libraries. You can either do not enable the module or install the libraries.解决:sudo dnf install libxml2 libxml2-devel libxslt libxslt-devel问题4:checking for GD library ... not found checking for GD library in /usr/local/ ... not found checking for GD library in /usr/pkg/ ... not found checking for GD library in /opt/local/ ... not found checking for GD library in /opt/homebrew/ ... not found ./configure: error: the HTTP image filter module requires the GD library. You can either do not enable the module or install the libraries.解决:sudo dnf install gd gd-devel问题5:checking for GeoIP library ... not found checking for GeoIP library in /usr/local/ ... not found checking for GeoIP library in /usr/pkg/ ... not found checking for GeoIP library in /opt/local/ ... not found checking for GeoIP library in /opt/homebrew/ ... not found ./configure: error: the GeoIP module requires the GeoIP library. You can either do not enable the module or install the library.解决:sudo dnf install GeoIP GeoIP-devel问题6:checking for Google perftools ... not found checking for Google perftools in /usr/local/ ... not found checking for Google perftools in /opt/local/ ... not found checking for Google perftools in /opt/homebrew/ ... not found ./configure: error: the Google perftools module requires the Google perftools library. You can either do not enable the module or install the library.解决:sudo dnf install gperftools gperftools-devel问题7:checking for atomic_ops library ... not found ./configure: error: libatomic_ops library was not found.解决:sudo dnf install libatomic_ops libatomic_ops-devel8.1.2. php问题1:checking for libsystemd >= 209... no configure: error: Package requirements (libsystemd >= 209) were not met: Package 'libsystemd', required by 'virtual:world', not found Consider adjusting the PKG_CONFIG_PATH environment variable if you installed software in a non-standard prefix. Alternatively, you may set the environment variables SYSTEMD_CFLAGS and SYSTEMD_LIBS to avoid the need to call pkg-config. See the pkg-config man page for more details.解决:sudo dnf install systemd systemd-devel问题2:checking for sqlite3 >= 3.7.7... no configure: error: Package requirements (sqlite3 >= 3.7.7) were not met: Package 'sqlite3', required by 'virtual:world', not found Consider adjusting the PKG_CONFIG_PATH environment variable if you installed software in a non-standard prefix. Alternatively, you may set the environment variables SQLITE_CFLAGS and SQLITE_LIBS to avoid the need to call pkg-config. See the pkg-config man page for more details.解决:前面的 SQLite 编译后生成的库文件被指定安装在 /usr/local/lib64 目录下,在对 php 进行编译配置时可在 configure 执行的参数中加入 PKG_CONFIG_PATH 变量来包含该目录,这样 pkg-config 工具才会找到对应库文件的pc文件,形式如下:./configure xxx \ xxx \ PKG_CONFIG_PATH=/usr/local/lib64/pkgconfig:$PKG_CONFIG_PATH问题3:configure: error: Package requirements (libcurl >= 7.29.0) were not met: Package 'libcurl', required by 'virtual:world', not found Consider adjusting the PKG_CONFIG_PATH environment variable if you installed software in a non-standard prefix. Alternatively, you may set the environment variables CURL_CFLAGS and CURL_LIBS to avoid the need to call pkg-config. See the pkg-config man page for more details.v解决:sudo dnf install curl libcurl-devel问题4:checking for enchant-2... no configure: WARNING: libenchant-2 not found trying with old libenchant checking for enchant >= 1.4.2... no configure: error: Package requirements (enchant >= 1.4.2) were not met: Package 'enchant', required by 'virtual:world', not found Consider adjusting the PKG_CONFIG_PATH environment variable if you installed software in a non-standard prefix. Alternatively, you may set the environment variables ENCHANT_CFLAGS and ENCHANT_LIBS to avoid the need to call pkg-config. See the pkg-config man page for more details.解决:sudo dnf install enchant enchant-devel问题5:checking for libffi >= 3.0.11... no configure: error: Package requirements (libffi >= 3.0.11) were not met: Package 'libffi', required by 'virtual:world', not found Consider adjusting the PKG_CONFIG_PATH environment variable if you installed software in a non-standard prefix. Alternatively, you may set the environment variables FFI_CFLAGS and FFI_LIBS to avoid the need to call pkg-config. See the pkg-config man page for more details.解决:sudo dnf install libffi-devel问题6:checking for libavif >= 0.8.2... no configure: error: Package requirements (libavif >= 0.8.2) were not met: Package 'libavif', required by 'virtual:world', not found Consider adjusting the PKG_CONFIG_PATH environment variable if you installed software in a non-standard prefix. Alternatively, you may set the environment variables AVIF_CFLAGS and AVIF_LIBS to avoid the need to call pkg-config. See the pkg-config man page for more details.解决:sudo dnf install libavif libavif-devel libavif-tools问题7:checking for __gmpz_rootrem in -lgmp... no configure: error: GNU MP Library version 4.2 or greater required.解决:sudo dnf install gmp gmp-devel问题8:checking for icu-uc >= 50.1 icu-io icu-i18n... no configure: error: Package requirements (icu-uc >= 50.1 icu-io icu-i18n) were not met: Package 'icu-uc', required by 'virtual:world', not found Package 'icu-io', required by 'virtual:world', not found Package 'icu-i18n', required by 'virtual:world', not found Consider adjusting the PKG_CONFIG_PATH environment variable if you installed software in a non-standard prefix. Alternatively, you may set the environment variables ICU_CFLAGS and ICU_LIBS to avoid the need to call pkg-config. See the pkg-config man page for more details.解决:sudo dnf install icu libicu-devel问题9:configure: error: Cannot find ldap.h解决:sudo dnf install openldap openldap-devel问题10:configure: error: Cannot find ldap libraries in /usr/lib.解决:在64位系统下,安装 ldap 时其库文件安装在64位库目录下,如 /usr/lib64 ,在对 php 进行编译配置时在 configure 执行的参数中加入 --with-libdir=lib64 即可,形式如下:./configure xxx \ xxx \ --with-libdir=lib64问题11:checking for oniguruma... no configure: error: Package requirements (oniguruma) were not met: Package 'oniguruma', required by 'virtual:world', not found Consider adjusting the PKG_CONFIG_PATH environment variable if you installed software in a non-standard prefix. Alternatively, you may set the environment variables ONIG_CFLAGS and ONIG_LIBS to avoid the need to call pkg-config. See the pkg-config man page for more details.解决:sudo dnf install oniguruma oniguruma-devel问题12:configure: error: Cannot find pspell解决:sudo dnf install aspell aspell-devel问题13:configure: error: Please reinstall readline - I cannot find readline.h解决:sudo dnf install readline readline-devel ncurses ncurses-devel问题14:configure: error: cannot find mm library解决:需要手工安装 mm 库,或者取消 configure 中 --with-mm 参数(与参数 --enable-zts 冲突,二选一)。手工安装主要过程如下:# 官网下载,速度极慢,甚至连接不上 wget -P /home/devuser/workspace/lnmp/ ftp://ftp.ossp.org/pkg/lib/mm/mm-1.4.2.tar.gz # 其他镜像备份网站下载 推荐 wget -P /home/devuser/workspace/lnmp/ https://www.mirrorservice.org/sites/ftp.ossp.org/pkg/lib/mm/mm-1.4.2.tar.gz # 解压 tar -xf /home/devuser/workspace/lnmp/mm-1.4.2.tar.gz -C /home/devuser/workspace/lnmp/ # 编译及安装 cd /home/devuser/workspace/lnmp/mm-1.4.2/ ./configure --prefix=/usr/local --exec-prefix=/usr/local --libdir=/usr/local/lib64 make sudo make install问题15:checking for net-snmp-config... no configure: error: Could not find net-snmp-config binary. Please check your net-snmp installation.解决:sudo dnf install net-snmp net-snmp-devel问题16:checking for libsodium >= 1.0.8... no configure: error: Package requirements (libsodium >= 1.0.8) were not met: Package 'libsodium', required by 'virtual:world', not found Consider adjusting the PKG_CONFIG_PATH environment variable if you installed software in a non-standard prefix. Alternatively, you may set the environment variables LIBSODIUM_CFLAGS and LIBSODIUM_LIBS to avoid the need to call pkg-config. See the pkg-config man page for more details.解决:sudo dnf install libsodium libsodium-devel问题17:checking for libargon2... no configure: error: Package requirements (libargon2) were not met: Package 'libargon2', required by 'virtual:world', not found Consider adjusting the PKG_CONFIG_PATH environment variable if you installed software in a non-standard prefix. Alternatively, you may set the environment variables ARGON2_CFLAGS and ARGON2_LIBS to avoid the need to call pkg-config. See the pkg-config man page for more details.解决:sudo dnf install argon2 libargon2 libargon2-devel问题18:configure: error: Cannot find libtidy解决:sudo dnf install tidy libtidy libtidy-devel问题19:checking for libzip >= 0.11 libzip != 1.3.1 libzip != 1.7.0... no configure: error: Package requirements (libzip >= 0.11 libzip != 1.3.1 libzip != 1.7.0) were not met: Package 'libzip', required by 'virtual:world', not found Package 'libzip', required by 'virtual:world', not found Package 'libzip', required by 'virtual:world', not found Consider adjusting the PKG_CONFIG_PATH environment variable if you installed software in a non-standard prefix. Alternatively, you may set the environment variables LIBZIP_CFLAGS and LIBZIP_LIBS to avoid the need to call pkg-config. See the pkg-config man page for more details.解决:sudo dnf install zip libzip libzip-devel libzip-tools8.2. 运行类8.2.1. php问题1:[devuser@linux php-8.2.22]$ sudo systemctl start php-fpm.service [sudo] password for devuser: Job for php-fpm.service failed because the control process exited with error code. See "systemctl status php-fpm.service" and "journalctl -xe" for details. [devuser@linux php-8.2.22]$解决:查看服务状态systemctl status php-fpm.service显示如下信息● php-fpm.service - The PHP FastCGI Process Manager Loaded: loaded (/usr/lib/systemd/system/php-fpm.service; enabled; vendor preset: disabled) Active: failed (Result: exit-code) since Sun 2024-08-04 16:07:51 CST; 3min 27s ago Process: 591211 ExecStart=/usr/local/php/8.2.22/sbin/php-fpm --nodaemonize --fpm-config /usr/local/php/8.2.22/etc/php-fpm.conf (code=exited, status=78) Main PID: 591211 (code=exited, status=78) Aug 04 16:07:51 linux systemd[1]: Starting The PHP FastCGI Process Manager... Aug 04 16:07:51 linux php-fpm[591211]: [04-Aug-2024 16:07:51] ERROR: failed to open error_log (/usr/local/php/8.2.22/var/log/php-fpm.log): Read-only file system (30) Aug 04 16:07:51 linux php-fpm[591211]: [04-Aug-2024 16:07:51] ERROR: failed to post process the configuration Aug 04 16:07:51 linux php-fpm[591211]: [04-Aug-2024 16:07:51] ERROR: FPM initialization failed Aug 04 16:07:51 linux systemd[1]: php-fpm.service: Main process exited, code=exited, status=78/CONFIG Aug 04 16:07:51 linux systemd[1]: php-fpm.service: Failed with result 'exit-code'. Aug 04 16:07:51 linux systemd[1]: Failed to start The PHP FastCGI Process Manager.其中关键字 Read-only file system 很特殊,大概率不是文件权限问题,经过查阅资料,发现这是编译生成的 systemd 脚本中一个参数值引起的,查看脚本可以看到如下信息# Mounts the /usr, /boot, and /etc directories read-only for processes invoked by this unit. ProtectSystem=full看下该字段的解释,引用自https://www.freedesktop.org/software/systemd/man/latest/systemd.exec.html#ProtectSystem=ProtectSystem= Takes a boolean argument or the special values "full" or "strict". If true, mounts the /usr/ and the boot loader directories (/boot and /efi) read-only for processes invoked by this unit. If set to "full", the /etc/ directory is mounted read-only, too. If set to "strict" the entire file system hierarchy is mounted read-only, except for the API file system subtrees /dev/, /proc/ and /sys/ (protect these directories using PrivateDevices=, ProtectKernelTunables=, ProtectControlGroups=). This setting ensures that any modification of the vendor-supplied operating system (and optionally its configuration, and local mounts) is prohibited for the service. It is recommended to enable this setting for all long-running services, unless they are involved with system updates or need to modify the operating system in other ways. If this option is used, ReadWritePaths= may be used to exclude specific directories from being made read-only. Similar, StateDirectory=, LogsDirectory=, … and related directory settings (see below) also exclude the specific directories from the effect of ProtectSystem=. This setting is implied if DynamicUser= is set. This setting cannot ensure protection in all cases. In general it has the same limitations as ReadOnlyPaths=, see below. Defaults to off. Added in version 214.当设置为 full 时,php-fpm进程将 /usr、/boot、/etc 目录以只读模式挂载,所以此时出现了该问题,将其修改为 off 即可解决。sudo vi /usr/lib/systemd/system/php-fpm.service参数修改为如下ProtectSystem=off重新加载修改后的 systemd 脚本sudo systemctl daemon-reload重新启动 php-fpm 即可sudo systemctl start php-fpm.service
-
Microsoft Visual C++ 运行库 官网地址可参考官方最新下载地址说明下载地址版本平台位数链接备注2015-2022 14.40.33810.0windowsx64VC_redist.x64.exe 2015-2022 14.40.33810.0windowsarm64VC_redist.arm64.exe 2015-2022 14.40.33810.0windowsx86VC_redist.x86.exe 2013 12.0.40664.0windowsx64vcredist_x64.exe 2013 12.0.40664.0windowsx86vcredist_x86.exe 2012 11.0.61030.0windowsx64vcredist_x64.exe 2012 11.0.61030.0windowsx86vcredist_x86.exe 2010 10.0.40219.325windowsx64vcredist_x64.exe 2010 10.0.40219.325windowsx86vcredist_x86.exe 2008 9.0.30729.5677windowsx64vcredist_x64.exe 2008 9.0.30729.5677windowsx86vcredist_x86.exe 2005 6.0.2900.2180windowsx64vcredist_x64.exe 2005 6.0.2900.2180windowsx86vcredist_x86.exe 2024-09-25 11:54:40 星期三
-
.NET Framework 官网地址英文网页: https://dotnet.microsoft.com/download/dotnet-framework下载地址版本平台架构链接备注4.8.1windowsx86/x64NDP481-Web.exe网络安装4.8.1windowsx86/x64NDP481-x86-x64-AllOS-ENU.exe脱机安装4.8windowsx86/x64ndp48-web.exe网络安装4.8windowsx86/x64NDP48-x86-x64-AllOS-ENU.exe脱机安装4.7.2windowsx86/x64ndp472-kb4054531-web.exe网络安装4.7.2windowsx86/x64NDP472-KB4054530-x86-x64-AllOS-ENU.exe脱机安装4.7.1windowsx86/x64ndp471-kb4033344-web.exe网络安装4.7.1windowsx86/x64NDP471-KB4033342-x86-x64-AllOS-ENU.ex脱机安装4.7windowsx86/x64ndp47-kb3186500-web.exe网络安装4.7windowsx86/x64NDP47-KB3186497-x86-x64-AllOS-ENU.exe脱机安装4.6.2windowsx86/x64ndp462-kb3151802-web.exe网络安装4.6.2windowsx86/x64NDP462-KB3151800-x86-x64-AllOS-ENU.exe脱机安装4.6.1windowsx86/x64NDP461-KB3102438-Web.exe网络安装 不再支持的版本4.6.1windowsx86/x64NDP461-KB3102436-x86-x64-AllOS-ENU.exe脱机安装 不再支持的版本4.6windowsx86/x64NDP46-KB3045560-Web.exe网络安装 不再支持的版本4.6windowsx86/x64NDP46-KB3045557-x86-x64-AllOS-ENU.exe脱机安装 不再支持的版本4.5.2windowsx86/x64NDP452-KB2901954-Web.exe网络安装 不再支持的版本4.5.2windowsx86/x64NDP452-KB2901907-x86-x64-AllOS-ENU.exe脱机安装 不再支持的版本4.5.1windowsx86/x64NDP451-KB2859818-Web.exe网络安装 不再支持的版本4.5.1windowsx86/x64NDP451-KB2858728-x86-x64-AllOS-ENU.exe脱机安装 不再支持的版本4.5windowsx86/x64dotNetFx45_Full_setup.exe网络安装 不再支持的版本4.5windowsx86/x64dotnetfx45_full_x86_x64.exe脱机安装 不再支持的版本4.0windowsx86/x64dotNetFx40_Full_setup.exe网络安装 不再支持的版本4.0windowsx86/x64dotNetFx40_Full_x86_x64.exe脱机安装 不再支持的版本3.5 SP1windowsx86/x64dotnetfx35.exe脱机安装2024-09-25 11:53:11 星期三